KM Box Net Setup
Connect to your 2nd PC with the included USB cable. (Port #1)
Connect to your main PC with the included USB cable. (Port #2)
Connect your mouse in Port #3

After successfully plugging in your KMbox Net, download THIS DRIVER and extract it on the cheat pc(2nd PC)
Inside the extracted folder find “WCHUSBNIC.EXE” and open it
Inside the driver installer, click the big “INSTALL” button and it will successfully install.
Restart the 2nd PC after the driver is installed successfully
In Control Panel, navigate to "Network and Internet"

Press "Network and Sharing Center"

Press "Changer adapter settings"

Find the KM Box network that should have appeared, right click and select "Properties". If your KM Box is not showing please unplug and re-plug it in.

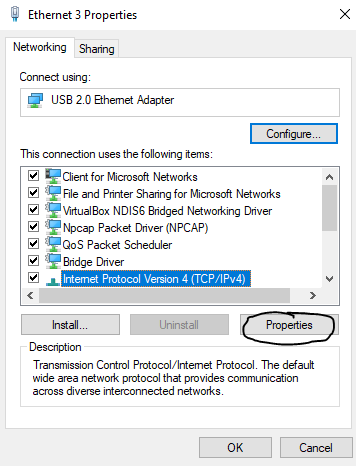
Make sure “Internet Protocol Version 6 (TCP/Ipv6)” is DISABLED; then click “Internet Protocol Version 4 (TCP/Ipv4)”, and make sure it’s enabled and then click properties like this:

Select "Properties".

"Use the following IP address"

Enter the following IP Addresses:
- IP Address: 192.168.2.100
- Subnet Mask: 255.255.255.0

Close / save all of the dialog boxes
Now to do a ping test to make sure the kmbox net is operating properly.
Open up CMD (Command Prompt) on your 2nd pc and ping the ip “192.168.2.188”
Open up CMD by typing CMD into the windows search bar and press enter
Once the cmd is open type in “ping 192.168.2.188”
It should successfully ping/respond 4 replies. Example picture is below

PLEASE, AFTER A PC REBOOT (like the next time you play), CHECK IF IPV6 IS DISABLED, IF IT IS IT’S GOOD, OTHERWISE YOU NEED TO DISABLE IT EVERYTIME
Last updated